Eight-strand plaited loaf : The wholemeal version

So this is take two of my attempt at an eight-strand plaited loaf and I am pleased to report that it was more successful than last time. Now I must admit this post is long overdue since you can probably tell I made this at home (when I went back for Christmas by the use of baking utensils. Anyway since it has been pretty cold here for the last week or so (with the odd bit of snow), I thought I’d do my updated post on this Paul Hollywood recipe.

Wholemeal plaited loaf

Now as I was making a wholemeal version of the recipe’s white loaf, I made a few changes to the original recipe:

– 450g strong wholemeal bread flour

– 150g strong white bread flour

– 12g salt

– 12g instant yeast

– 35g unsalted butter, softened

– 400ml or so of tepid water

– Olive oil

Since flour is one of the key ingredients, I think it is best to buy a good quality bread flour as you will definitely reap the rewards on tasting. We tend to use the Allinson Flour brand and for the 450g wholemeal bread flour of this recipe, I used a combination of this seed and grain mix with this country grain mix. I particularly enjoyed the ‘country grain’ mix which had malted wheat flakes, rye flour and malted barley flour in it with the seeds as they created a lovely nutty flavour and texture. The inclusion of a little white bread flour gives the dough a slightly lighter texture as sometimes dense wholemeal flour by itself can be a bit ‘heavy’ – however if I use the same to mixes in the future I doubt I will need to even use the white flour. Obviously you can replace the quantities with whichever flours you prefer and have readily available.

Other than that, the steps of the recipe were as before. You can of course just use the recipe and make *ordinary* shaped loaves but since it was our ‘Christmas’ dinner (explanation at the end), I thought it would look pretty on the table.

1. First mix the bread flours with the yeast and salt, taking care not to let the yeast and salt mix. I like to do this in a large bowl otherwise it goes everywhere.

2. Add 3/4 of the butter and a little water at a time into the bowl. Gradually continuing mixing the dough until you have added all the butter. You don’t really need to use all the water if the dough comes together easily. It should be pliable and not too dry/wet and you can now turn it out onto a lightly oiled and clean surface.

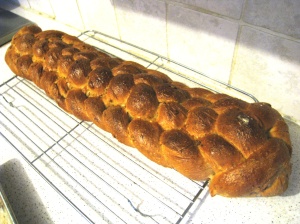
3. Knead the dough for 5-10 minutes until it begins to stretch back. You can test when it is ready by prodding a finger into it, if it bounces back to its original shape, it’s ready for proving. Form the dough into a rough ball shape and place into a lightly oiled bowl. Cover with cling-film and leave in a warm place to prove for an hour.

wholemeal dough

Photograph is before proving

4. Knock back the dough (give it 2-3 kneads). It is now ready for plaiting. This time I took it a little more seriously and actually weighed the dough and divided it into eight equal portions. Roll out with your fingers into sausage-like strands against the surface and move your hands from the centre out to the edges each time to keep the shape even. You need quite a bit of patience here as the dough likes to stretch back so you have to persevere and I aimed for strands of about 45cm in length. It took  a good 20 minutes. Once they are all even width and length, arrange them like so:

Strands at the ready!

5. – Number them from left to right 1-8. ‘Squidge’ (technical term) the top of the strands together and tuck underneath slightly to create a neat starting point. Then:

– Place 8 under 7 and over 1

– Place 8 over 5

6. – Place 2 under 3 and over 8

     – Place 1 over 4

     – Place 7 under 6 and over 1 

7. Repeat only step 6 (all the highlighted parts above) until you run out of dough.

8. Squidge the end strands together and tuck neatly underneath again.

Plaited loaf

9. Place your now plaited loaf onto a floured large baking tray and cover again for a second proving for another hour or so.

10. Brush your loaf with beaten egg wash and bake in a 200 degrees Celsius oven for 25 minutes (thereabouts) until golden brown on top and portrays a hollow sound when gently knocking the underside of the loaf.

11. Treat with love and serve. I made this for our ‘Christmas dinner’ which was actually our New Years Day lunch/dinner and decided to cut it in half with smaller slices arranged around the plate. It does particularly well with soup. Enjoy!

1st attempt

1st attempt

2nd attempt
2nd attempt

Super quick panini sandwich

So this post is ultra late on account of my excitement at all the Christmas food at home – anyway it is just a super quick sandwich that you can fill with anything really, but toasting it in the oven just gives it that extra warming feel.

I bought a pack of panini rolls (you could use ciabatta, or ordinary round rolls) and cut them lengthways in half. Drizzle with a little olive oil if you like and place flat side up in a hottish oven (around 180 degrees Celsius) for 10-15 minutes or so until crisp and golden.

Panini bread

Meanwhile, prepare your filling. I just used a lot of salad vegetables, baby gem lettuce, thinly sliced cucumbers, tomatoes and some grated cheese. For another lunch I used tomatoes, cheese and some pesto for an Italian take. That was yummy too.

Panini salad filling

Then the fun part. Sandwich assembly – just organise your filling inside (I like to put the cheese straight onto the bread so that it melts). The only thing is that because I stuffed the sandwich it was a little bit ‘high’ so I had to squish it together to eat.

Salad Panini lunch

I think this makes a quick and easy lunch by itself (two when you’re hungry) or served with other things – and I would love to hear your favourite sandwich fillings in the comments below to give me some more ideas too!

Homemade garlic bread

After seeing quite a few shop-bought garlic bread packs taken out of neighbouring freezers and shoved into the oven – I thought I would do a quick post of how to make your own garlic butter. I always find shop-bought garlic bread is nearly always far too buttery, so making your own is a slightly healthier alternative and in my view tastes fresher! To completely make your own garlic bread, you could make lovely little rolls or a baguette from a basic bread recipe – wholemeal is even better. I saw these ‘bake at home’ rolls in Tesco’s on sale and was inspired to make use them for garlic bread so used those instead.

All you will need is some:

-Butter

-Garlic

-Mixed herbs

-Bread rolls

Garlic bread ingredients

Now there isn’t really an exact ‘recipe’ for this garlic butter so you can just season according to personal taste. Crush and finely chop as much as possible some garlic cloves depending on how much garlic butter you want. For the six rolls here, I used one clove.

IMG_7519

Add a large knob of butter and mix together thoroughly. I also added in some dried mixed herbs at this point. Cut the rolls lengthways with a sharp knife and spread some of the garlic butter inside.

IMG_7523

These garlic bread rolls are easy to freeze so you can defrost them as and when you need them. Leftover garlic butter is delicious on toast or a served with steak. I actually ate them with the roast chicken wings, carrots and rice I had for dinner a few nights ago – it was a hearty meal for a starving person!

Hearty dinner

I actually par-boiled the carrots beforehand and then put them underneath the roasting chicken wings to absorb the flavour and juices for the last 10-15 minutes of cooking.

Focaccia

I love bread, everything about it – I like eating it, taking photos of it, making it, talking to it sometimes, kneading it, the whole shebang. I can’t remember where I got this recipe from but foaccia always looked really fun to make (what with all that poking) so I thought I would give it a go.

Focaccia

Preparation time : about 3hrs (including proving time)

Baking time : 30 minutes

-500g strong white bread flour

-1 and a 1/2 tsp salt

-7g dried fast-action yeast

-2 tbsp extra virgin olive oil

-125g ball mozzarella

-5 tbsp pesto

The thing I like about bread (the easy kind) is that it doesn’t require many ingredients, just some scales and a strong pair of arms for some kneading!

First I mixed the salt with the flour. Then mix 325ml tepid water with the yeast. Salt deactivates the raising agents in yeast so that’s why you don’t mix them altogether first. I like to turn the salt and flour onto a clean surface and make a hole in the middle of the mound (sort of like a volcano) and add the liquid yeast and olive oil a little at a time, mixing in the surrounding flour.

The dough should be pretty gloopy and fairly sticky at the moment. Knead the dough for 15 minutes pulling and stretching it so that it becomes airy. When you dent it with a finger it should bounce back almost to its former position, if not knead a little more. Place the dough in a well oiled bowl and cover with cling film. Prove for an hour or until the dough is double in size.

Before

After

Hopefully you can sort of see the change in size in the’before and after photos above. The proven dough should be very airy in comparison to above. Gently tease it out of the bowl onto a lightly floured surface and ‘knock it back.’ By this, I mean knead it a few times until its elasticity was as before (less marshamallowy and more doughy). Then stretch it out to a size of roughly 20 x 30cm onto the baking tray. Cover with a damp cloth loosely and leave until half as high again for about 45 minutes.


Then the fun part. Use your thumb to make the signature  ‘dimples’ in the dough and then bake in a preheated oven at 160 degrees Celsius for 15 minutes. Tear some strips of the mozzarella and return to the oven for a further 5-10 minutes until the bottom is fully cooked and slides off the tray.

Drizzle with a little pesto, olive oil and sea salt and it’s ready for sharing!


cooked as part of this menu

An Evening of Baking

Who doesn’t love an evening spent baking? I thought I’d make some of my passion fruit cake and some brownies to take along to a picnic at our local parkrun tomorrow to celebrate its first year anniversary (see links for recipes). I actually bought some espresso flavoured Green & Black’s which is absolutely scrummy for the coffee lover in me – the flavour came through the brownies just the right amount I thought (and slightly easier than going through the faff of making some strong instant coffee).

  Coffee and Hazelnut Brownies

 Passion Fruit Cake with Coconut Crumble Topping

Inspired by the Great British Bake Off ‘s most recent episode, I also attempted Paul Hollywood’s recipe for an eight-strand plaited loaf which was the technical challenge in the episode.


In hindsight I should have made slightly thinner strands to make a longer loaf as mine was fairly ‘chunky.’ But I think it looked pretty good even though I freestyled a bit towards the end as some strands were running out before others!

I do love the recipe’s crunchy golden crust though!

Not much left over after the gannits in our house had their share…

Please comment or share your own pictures if you had a go or made anything yummy recently! I would love to hear from you. Ta-ra!

Banana and Walnut Loaf/Cake

So as a result of my poll a month or two ago about which recipe to try next, banana and walnut loaf received the most votes. I had actually tried out a different recipe of a banana and walnut loaf, however it didn’t turn out great thanks to my dumness in using unripe bananas and some lazy measuring… The Delia Smith recipe is worth trying if you like heavier fruit cake-type loaves, as it has cinammon (which I despise) and dark brown sugar and seems to last well. So after that attempt I hastily deleted my photos and tried another one. Although this one didn’t turn out too great either, but I thought I’d put off this post long enough and I should just get on with it. So here is the recipe for my second attempt.

I rather like this recipe. I searched for a non-butter loaf so my mother wouldn’t feel guilty about eating it and came across one which was sort of in between a cake and a bread loaf. So it is a little bland as it doesn’t have any fat and little sugar, but I think it has a nice fruity taste. So here goes.

Banana and Walnut Loaf, makes two small loaves

Preparation Time : 20 minutes

Baking Time : 40 minutes or so


– 300g self-raising flour (white)

– 70g brown sugar (although I used a combination of demerara and caster so it wouldn’t be so dense)

– 100g walnuts + (broken into pieces)

– 1 tsp bicarbonate of soda

– 2 eggs

– 250ml milk

– 2 very ripe large bananas, mashed

– 1 tsp vanilla essence


First I cut up the bananas into a plastic bowl (so the fork wouldn’t scrape against it noisily) and used the fork to mash it up.


Then sift the flour and bicarbonate of soda into a large bowl. Add the rest of the dry ingredients (sugar and nuts) and stir around

Next crack the eggs one at a time, mixing in between. Pour in the milk and finally add the banana.


As you can see, at this point my mixture was rather runny. With hindsight I think I would have added a little more flour to firm it up a bit before pouring the mixture into the tins and baking. Bake at 180 degrees Celsius for 45 minutes until ready. Cool on a wire rack.


Consume.

Choose the next recipe on my blog!

Hey guys, so I have plenty of new recipes that I have been wanting to try, but not that much time – I recently started a new job at a farm where I get lots of lovely organic fruit and veg, meat and eggs, so I would love to put them to good use, but my sweet tooth also beckons…  Anyway since I can’t decide, I would love it if you would vote in my poll just below and I will try out the recipe with the most votes! Thanks!

So you can see my dilemma… it’s a pretty random bunch of recipes but I have been saving them for a while and would appreciate the votes. Ta! Also if you have any additional ideas that you think I could try, please comment and I will consider them all.

Individual Pizza Margheritas

So I am embarking on cooking dinner tonight, hence the busy-ness (I always read business as bis-ness, never busi-ness, so thought I’d make it clear) on the blog. First up are individual pizza margheritas. This recipe is very flexible and makes 4 small individual pizzas or 1 large one. It’s the same recipe that I use for making ordinary white loaves, only just scaled down. Here’s how I make it.

Pizza Margheritas, makes 4 individual pizzas or 1 large pizza

Mmmm...pizza

Preparation time : 25 minutes + 1 hour proving

Baking time : 25 minutes or until crust is pale brown and crispy

– 150g strong white bread flour

– 1/2 tsp flaky sea salt

– 1/2 tsp fast-action yeast

– 100ml warm water

– 1tbsp extra-virgin olive oil

– 1/2 clove of garlic

– 70ml of passata (crushed and sieved tomatoes)

– 1/2 tsp dried oregano

– Handful of basil leaves or a few tsp of dried herbs

– 60g mozzarella, sliced

-Handful of cherry tomatoes

First, make the dough.

Dough-making commencing!

You can either mix in a bowl or on a very clean floured surface. I normally clean the surface with water and then dry with a paper towel. My post on how to bake a classic white loaf with give more detail in dough-making. Add the flour, yeast and flaky sea salt and toss until mixed. Next add in the tsp of extra-virgin olive oil. A good tip is to mix the warm water afterwards to clean the spoon so you don’t waste any of the oil. The temperature of the water is very important in making dough. Water that is slightly warmer than tepid is just fine. If the water is too hot, it will denature the yeast and your dough will be unusable. Use your hands to bring the ingredients together into a relatively gloopy mixture.

Turn out your dough onto a lightly floured surface so that it does not stick. Knead for about 10 minutes until the dough springs back when dented. Be sure to properly work the dough to stretch it out and activate the gluten by adding air to the mixture.

When you are satisfied with the dough after 10 minutes, shape into a ball and place into a large floured bowl. Cover with cling-film or an elasticated showed cap (thank you Fabulous Baker Brothers for the tip!). Leave in a warm place for an hour to prove. It should double in size at a warm temperature, if not, leave a little longer.


Whilst the dough is proving, you can make a start on the pizza topping. To make the tomato base, crush the garlic into a bowl. I find it easier to chop finely first and crush with the back or the knife. Add the dried oregano and torn fresh basil (or mixed dried herbs) as well as the passata. Mix and season well with salt and pepper.

For the margherita topping, slice the mozzarella and cherry tomatoes. The great thing about this recipe is that your can personalise the toppings so feel free to explore! Use the back of a spoon to spread the tomato sauce over the pizzas, remembering to leave room for the crust. Add the mozzarella and a few cherry tomato halves and any other toppings you wish (I added a few pieces of pancetta from the bolognese main I was making as well – upcoming post!)

Zap into the oven at 240 degrees for about 25 minutes or until the dough is crisp and nicely browned.

The versatility of these pizzas also extends to being freezer-friendly. This saves time if you want to make a batch in advance and then cling-film them for the freezer for a quick meal when you are in a hurry!

Classic White Loaf

Everybody should make a classic white loaf at least once in their lifetime. It’s great being able to make such a necessary food that is normally bought at the supermarket. Well after this, supermarket bread will be no more! Fresh home-made bread beats it any day. This recipe is from the Fabulous Baker Brothers series that has just finished on channel 4 which I tried out recently – with success! Unfortunately that was before I began this blog and so I am short of photos – apart from the end product. So you’ll have to make do with my literal descriptions instead. Sorry!

Classic white loaf, makes one large loaf or two small loaves

-560g strong white bread flour, the best you can get

-10g sea salt

-20ml rapeseed oil (any plant based oil such as sunflower or vegetable will do)

-5g dried yeast

-300ml warm water

Make sure you have a clean surface to start with. I normally wipe it with a damp cloth and then dry with a paper towel. Then measure the flour and salt and place in the middle of the work surface. Make a hole in the middle so that it is almost a small well with the flour surrounding it.

In a small jug, mix the yeast with warm water until dissolved. Pour this mixture into the well and gradually mix a little more flour into it until all the flour is bound with the water. It should be really sticky at this point. Drizzle the oil and continue mixing by hand, forming it into a dough. Flour the surface as needed and knead for 20 minutes. Kneading allows air to get into the dough making it soft and springy when eaten. It also enables the gluten in the starchy flour to be stretched out creating an elastic-like texture. The kneading is crucial to baking really great bread – so stick at it!

Shape the dough into a ball shape and place in a oiled/floured bowl to stop it from sticking. Dust the top with a little flour and leave in a warm place to double in size. Cover with cling-film or an elasticated shower-cap. This should take an hour or so.

Carefully scrape the dough out, which should feel springy. Shape to fit your well-oiled loaf tin. Dust with more flour and slash diagonally.

The loaf (or loaves) need to bake at 240 degrees Celsius at first for 10 minutes. Then lower slightly to 210 degrees and continue baking for 30 minutes. (Bear in mind that two small loaves will cook slightly faster than one larger loaf.) To check that your loaf is cooked, slide out of tin and gently tap the bottom. It should sound hollow. Et, voila! Slice and serve up with your favourite sandwich filling.

You could also make round rolls if you wanted a great individual bread that goes well with soup starters. I’m on a mission to make some healthier wholemeal bread next, so keep your eyes peeled for the next bread post!